Saturday 9 August 2014

Loom Butterflies

Lately I've been doing a fair bit of looming with rubber bands. I have a Friendly Bands loom, the eldest daughter has a Rainbow Loom, and I have found they each have their strengths.

I've also discovered that a crochet hook works pretty good if you want to make things on the go!

I was pretty happy when I found this gal over on YouTube, lots of tiny charms, many by crochet. I now have a small army of snowflakes and butterflies.


It didn't take long for me to start making them in my own fashion - lining up the bands along my finger, then wrapping the extra band around four times. She wraps hers on the crochet hook directly, which I have found to be problematic. Maybe it's my bands, they love the crochet hooks and won't let go, maybe it's my preference for four loops instead of three. I did discover that five times around my finger is painful. (ouch!)

I made one change to Made By Mommy's design in the above tutorial - I use three bands instead of two for the top wings, making them slightly larger than the bottom wings pieces. I also use two bands for the body, which oddly gives it a more triangular shape.

Fun with filters!

Subtle changes, but ones I am quite happy with. :)

Wednesday 18 June 2014

Shelf + paint = crazy

This is what happens when I have a new shelf, access to my daughters paints, and a bit of energy.


Might do black and white in the same style on the top. I used up 4 of my Tiger-monkeys' colours on this little impulse project, and she says it's OK if I use up others. ;)

Wednesday 13 February 2013

Tie-dyeing fun time.


Spiral fold, blue and purple on white.
I've been having a bit of fun with tie-dyeing blank shirts since doing up the Ingress shirts in December. The first couple of shirts have faded dramatically, and after a bit of reading and experimentation I think I have come across a method that suits the Rit dyes that I have been using.

1) Soda Ash pre-wash. AKA caustic nasty stuff. I added a small amount to a bucket of warm water, soaked the shirt for about 10 minutes, then wrung out as much water as I could before I folded it into the pattern shape I was planning.

This stuff burns, so use safety equipment, and have someone keep the small creatures out of the room. I'd made the mistake of taking off my rubber gloves part way through one dye batch, and I was in for a few hours of hurt as punishment. Many places recommended using detergent added to the dye, I'll have to try that next time.

Heart fold, purple on purple
2) Don't mix the dyes too strong. As you can see in the heart fold image - one side is brighter than the other. The dye was mixed so strongly that there was still undissolved powder in the dye. This happened a lot with this batch, with some interesting (and repeatable!) results.

I followed this video on making the heart shape. How to Tie Dye Heart - YouTube

It wasn't as tough as I thought it would be, although the folding part was fiddly and needed redoing a few times before I felt the end result would be recognizable. I think the next heart shape I make will need to have finer folds. When you realise this one is on a child's size shirt, the size of the folds is expected. The folds on an adult shirt would be more numerous, and the end result I think would look much more intricate.

Spider fold, blue and green on white
3) Don't be afraid to refold and refold until you are content.

I used Tie-dye Wiki - Spider as my reference. Lots of fold goodness there, and a lot of "I must try that!" on my future to do list. This was only my second real foray into serious tie dye work, and most of these shirts were for gifts, so I stuck with the basics.

As with the heart shape above - the spider fold proved tricky. I think I folded this one five times before I was happy with how the fold looked. I had to give it a bit of a re-soak in the Soda Ash, I was working on a very hot day and the shirts were drying faster than I could work!

This was also where I burned my hand with the soda ash, I'd gotten impatient with my folding and took off the gloves so I could get a better result. Oops!

Chaos fold, fuchsia on pink
4) Leave the shirts somewhere very warm and bright.

Other recommends are to use a non-food microwave, iron or other method of high heat. We've only the one microwave, and the iron set method was less than perfect. (The shirts from a previous attempt used the ironing method have faded dramatically. This is Australia, where the sun is mean, so we went with that.

As each shirt was dyed, my husband took each one, bagged it, and set it out in the bright sun to 'set'.

It was a fairly hot day (35C), and I will admit to getting a bit impatient. Original plan was to leave the shirts overnight, but after 6 hours I wanted to see the results.

They were fabulous. :D


Spiral fold, purple on purple
Spiral fold, black on grey
Spiral fold, fuchsia on pink
Chaos fold, purple on white
Accordion fold, black on white

Monday 10 December 2012

Ingress T-shirts

My husband did up a T-shirt of the Ingress logo, and posted the result to the G+ #Ingress stream. He's pretty proud of it - you can see it here. He was even more chuffed when it garnered him an invite code. Now he just has to solve the pesky technology problem that is preventing us from playing.

His was a pretty simple process - put a mask on a t-shirt, and splattered it with bleach. He used scotch tape, which didn't quite stick as well as he hoped, although we agree the flaws make the image unique.

I decided I wanted a shirt of my own, so I found myself a black shirt to start with. I wouldn't be putting the shirt in a dye bath, so I used a printed sticker as my design mask.

I haven't decided on my faction - I just liked the Enlightenment design to work with. Is Canberra under Shaper control already? The thought just makes me giggle. I do have a second black shirt like the one I used for the Enlightened shirt, and plan to make myself a Resistance version.

My Enlightened shirt would be using the bleach method, but I didn't want to go splattering in the backyard. It was a lovely day outside, a bit warm for my preference, and a light dry breeze. My creative eye had an image of a starbursty pattern coming out of the centre of the design, but when I went to put it down on fabric, oh how horrid it looked.

Think fast, how could I save it?

I never thought I'd say the answer was to relive the 80's. I'd done acid wash plenty of times as a teen. Acid wash jeans were all the rage and I'd gotten quite good at making my own.

I filled a spray bottle with undiluted bleach - with the heat and the bright sun, I had to work fast. For the original idea the shirt was on newspaper, that wouldn't work at all. I tossed the paper aside and just crumpled the shirt on the pavement and went to town with the sprayer. Every 'coat' of the shirt I would flip it over, smooth it, recrumple, then more spraying, repeat until happy.

(No final image - yet. Not totally happy with it and will be doing a bit of a fine tune first.)

For the Resistance shirt I'll use diluted bleach, and start with a damp shirt. I'm hoping this will make the bleach soak into the fabric a bit better, even though the surface of the shirt appears quite bleached, the inside is still quite untouched.

I thought I'd try another masking technique on one of Tiger-monkey's white shirts. I'd been looking for months for Elmers blue gel glue. Elmers is a North American brand, one I had trouble finding in Australia - no one I asked had ever heard of it. I couldn't even find a blue gel glue, just white glue which so far had made ugly messes of all attempts at dye masking. Last week I literally tripped over Bic's blue gel glue at the Reject Shop, and have been itching to try dyeing with it since.

I wet the shirt, and put a plastic lid in it to keep it steady. I placed a cut out piece of paper on the shirt, and put the glue down in a careful manner. I was worried I'd not used enough, and scared I'd used to much. Knowing I couldn't win that tug of war, I went with trying for an even coat with a paint brush. I set the shirt in the sun to dry the glue, which took far less than I'd read it would. Nice thing about the hot Australian summer sun, clothes dry fast!

My last attempt at tie dye was horrific. I'd rolled the fabric perfectly, and then put the elastics on so tight that the dye couldn't get anywhere. Whups!

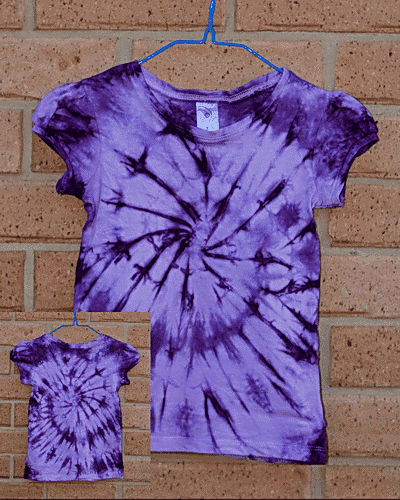
So this time I remembered, firmly rolled fabric, relatively loose elastics. I nearly forgot to put the salt in the dye bath, and I did forget the liquid soap. (Last time I forgot both!)

I made the dye bath with off boiled water, probably 80c or so. I made the dye fairly dark, and didn't make a lot of it - not even enough to cover the shirt when placed in the bucket.

For amusement I decided to just set the roll in the dye bath, and let it soak it up. I think I left it in the dye bath for about 15 minutes, gently lifting the bucket to move the dye around, and pressing down on the elastics.


The gel glue worked a treat, and appears to have come out during the dye bath. I expected to have to remove it afterwards, so either the glue wasn't on thick enough, or the dye bath was too hot. Possibly both - as there is some dye where the glue should have stopped any colour from taking place.

Still, I love the result.

If you make your own Ingress shirt after reading this - I'd love to see it! Link it in the comments here, or on the post on G+.


Friday 7 December 2012

Cinnamon Roll Sugar Cookies

I may have been baking a lot more in the last two months than in the last two years... These turned out good, but silly me left them in the standard sugar cookie time, when I should have cut the time. They didn't burn, I'm guessing the roll aspect means the baked much faster than their cookie cutter counterparts.

Cinnamon Rolled Sugar Cookies
End result: Teeth breakers. Not at all appealing.

So I stuck them in an airtight container with a slice of bread, and soon they were nice and perfect.

Bread, is there anything it can't do?

*bread image by hhh316 on DeviantArt, used under Creative Commons Attribution 3.0 License

Tuesday 4 December 2012

Abstract Crayon Painting

Next time I do this one, I remember that shaved wax crayon has static funtime, and will get all over everything while you are working. Tiger-monkey had a great giggle at me picking up the plastic cup of crayon shavings and watching the shavings jump on to the table!

I put two 4x6 canvas down on parchment paper on a cooking sheet (in the middle of the sea...), and turned on the oven to about 160c. Once I had all of my colours shaved I then tried to arrange them on the two pieces of 4x6 canvas board.

Crayon Shavings on Canvas

When it was ready to melt I turned off the oven. I didn't trust the fan forced enough to leave it on, the last thing I needed was crayon bits all over the inside of the oven, it's bad enough the kitchen table was covered with them! As it worked out the heat was more than enough. I pulled the art out of the oven a couple times to push the melted wax to the edge of the canvas with a toothpick, before putting it back in to remelt. Repeat a couple times, and voila! I think it's art!

Melted Crayon Shavings on Canvas

Now to cover it with a clear epoxy, and hang it up!


Sunday 25 November 2012

Nanaimo Bars

For the last few months I have been craving, absolutely craving, a dessert treat I'd had occasionally in Canada before I moved to Australia. I'd never made it, it was so sweet you'd only ever have the one (or two) piece(s). If I wanted to have it Down Under, my only option was to make it.

It's not a recipe that I'd trust to Googling, and all the ones I came up with just didn't look quite right. Cue a Facebook post asking my Victoria, BC friends for help. Within minutes I had a recipe fromThe Complete Canadian Living Cookbook to start from. (Thanks Helen!!) Yes, I moved to Australia without one of the quintessential cook books of Canada. I'll have to rectify this - and try to replace my out of print Five Roses Cookbook that was lost in a flood years ago.

Nanaimo Bars

The recipe Helen gave me would make a HUGE batch, more than the 5 of us should realistically eat. (Maybe I should have waited a couple weekends, where we'd be going to a summer party...) It's on the fridge waiting for that party in December. The Canadian Living website version of the recipe Helen sent me is subtly different.

Then Diana linked me to a smaller version from the City of Nanaimo webpage. In hindsight, this should have been my starting point, having believed for many many years that Nanaimo Bars had nothing to do with the city, I'd eliminated it as a suspect from the get-go.

Then came hurdle number one. There are no Graham Crackers in Australia. (That I have been able to find here in Canberra.) I bought 3 different types of Arnott biscuits, Marie, the most recommended as a substitute, and because the image on the packaging looked right, Shredded Wheatmeal and Granita.

I had thought I'd divvy the batch into three to test, and decided I'd likely get them mixed up and have to start again. Besides, using one at a time meant more days of experimentation and treats!

Shredded Wheatmeal was Tiger-monkey's choice. Clearly, she knows something I don't. The result was PERFECT. The squares are tiny, but packed with yum.